Wednesday, February 25, 2009

Something's Brewing

Photobucket

Now that the Carnival socks are done, I have made it my goal to work on at least 1 KUAS pattern a day, free or for sale, to update it, make them all look uniform, sweep for any typos missed, clarify if need-be, turn the free ones into pdfs, link the pdfs to my blog & Ravelry, etc. It's a arduous process, and I'll probably be bald by the time I'm done, but it will be worth it. No patterns that have not been updated recently will be for sale, so you'll see on my sidebar that there's only 2 patterns up there.

Photobucket


Photobucket

It's been a gloriously sunny day. I decided to whip out a FO that was completed maybe a year ago and has never found its way into this blog. It was a design for one of the clubs I did a long time ago. I named it "Sunrays Socks," due to the sunrayish lace pattern that I fiddled around with, and the snake-like cables planted along the back. I really think that they should be longer socks, to look better...but what's done is done. I recently took a picture of it because the Word document and the few original photos taken were deleted along with other various patterns and things that I had on my desktop during the "Great Disaster" back several months ago with my external hardrive failing on me...while I was trying to delete everything off of my desktop in preparation to reset the dang thing. I never did reset it...and I never did get back the lost things. Luckily, a lot of my pics weren't all deleted yet, and I had some copies of pictures on Photobucket & Flickr, as well as some documents saved through email.
It was a disaster, I tell ya.

Photobucket

Ending on a good note....I have a new blog! It's: http://www.kuasdesigns.wordpress.com/, and it's purely devoted to all of my patterns, free & for sale. I used Wordpress serviced mainly because I could upload the pdfs to that sight. Go take a look-see if you have time. There's a button on my sidebar for easy access to it. It's still in the beginning stages, so don't expect too much, but I have most of the pictures up that will have their proper pattern linked to them with PDFs. That's right, I said it. All patterns will now have pdfs. So, hopefully you'll see changes everyday (or every other day) if my 1 pattern per day thing becomes a reality. I already have 3 or 4 patterns updated. However, this blog will always be running. I have to ramble about my WIP's and designs still. lol.

(However, I expect this weekend to be slow with improvements. I'm planning on visiting my guy this weekend in Iowa! Squee!!! I asked one of the AV workers at the library to take my Sunday, so after my morning Friday shift, it's off to Iowa it go. Hei-HO! Hei-Ho!)
P.S- read "Wesley the Owl" if you're a bookworm. It's a great book, and it made me laugh & cry!
P.P.S- If you've been around for a while on this blog, I think I'm officially starting my Lana Lang -inspired sweater I talked about (maybe years) ago. Ha ha.

Thursday, February 19, 2009

Carnival Socks (KUAS Original Design)


Photobucket
About the pattern:
During the Medieval times, there was a clear structure to the way of life. You were either at the bottom of the class “pyramid” being a serf, or you were right dab in the middle or upper middle living as one of the the nobility, or as a priest or even a Lord... or you were at the very top living in high luxury as the King/Queen. You knew your place during that time…and there really was nothing you could do to change your status. Except right before Lent: the Thursday up through Ash Wednesday. The most recognizable terms nowadays from this folk culture would be Mardi Gras, or "Fat Tuesday," which would be the end of the festivities. During these few days in which the festivities were coined "the Carnival," you were allowed to switch roles. And that definitely called for a celebration. Serfs pretended to be like priests, or Lords, and had their fair share of profanity & mocking the whole class system, as well as their own Christian religion. The priests and the Lords really did sit around and let the serfs act as they pleased for this short period of time because they believed that if they allowed for it, briefly, it would reduce the tension on the whole poor-rich and unjust system (in the eyes of the serfs, of course). The serfs would get to blow their steam out, and a REVOLUTION among the people would be less likely. So, the Carnival, or Mardi Gras is a tradition that is still celebrated to this day. It is a time to be FREE, act as you please (think about the tradition of beads), and to feast as much as you want…because come Wednesday, it’s time for fasting (Lent) for 40 days.

This pattern tries to hold to a “nothing is at is seems” quality, where the stockinette has vertical lines protruding out, and the gusset & rest of the lower body of the foot without a pattern is completely purled. Even the ribbing on the top seems different, due to the nature of the *K2TBL, p2* where the two knit stitches separate from eachother a little.


SOCK METHOD: Top-down

MATERIALS:
Yarn: under 350-375 yds of fingering-weight yarn in a varigated colorway.
Needles: Set of 5 size 2US dpns & one darning needle
1 Stitch-holder
Place Marke

This free pattern has been removed 10/17/12. It may or may not return, but if it does, it will be tweaked and pdf’ed and available for an inexpensive $1.99 price.

Photobucket


Photobucket


Photobucket


Nothing's what it seems

Photobucket

In light of the upcoming festivities this Tuesday (Mardi Gras), I have decided to type up and give you the "Carnival Sock" pattern free. However, you'll have to wait until it's typed up. lol. It should be done within the next day or so. It's up & running!! That's how much I love you all. (It's time to sleep now, lol!) If you want to ravel-it, it's already in the pattern system.

Photobucket

Monday, February 16, 2009

FO this! (Updated)

Photobucket

Before Valentine's day, I got my "Punk Rock Tunic" done just in time for Joe's arrival on Friday. I'm pretty please with the results.

Photobucket

I used a ball of yarn closely related to Lion Brand's Jiffy. They might be cousins. Or Step-siblings. Or married. Who knows. All I know is that I knocked almost a couple pound ball down to almost nothing.

Photobucket

I decided against my seed stitch sleeves. While trying it on, I realized that it really looked better with the roll-top edge to leave it short & naked. Oh-la la.

Photobucket

A belt does look good with this FO. I don't know about you, but I see the perfect belts for all sorts of things in magazines, but when it comes around to finding them...good luck. I think my brown leather belt looked the best. But then again, I only own like 3 or 4 belts. I almost made an I-cord belt that was braided using this yarn.

Photobucket

Photobucket

Here's my hunny with his "Emmett hat." I had to squeeze in a minute before he left to take a picture of him with it on. I still have to send the pattern to my testers. Sorry for the wait girls.

Photobucket


I gave my valentine my heart.

Photobucket

Oh, by the way, I spent like 3 hours several days ago really uploading dozens and dozens of projects the you have or have not seen me make in my past. I also added more pictures to the projects that were already in my ravelry project page. Believe you me, it was a pain in the neck to add over 60 projects in one sitting. The oldest projects have minimal info. If you haven't friended me yet, my Ravelry name is: knittyknitter. Just like Craftster.org.

Photobucket

What's next? My "SlipStitch Socks" using my friend Erica's "Mardi Gras" sockyarn that I traded with her last year. I missed the deadline for making them in time for last Mardi Gras, but I'm determined to make them this year. Just like a pair of St. Patrick's Day socks.

Photobucket

Btw, if anyone ever wants you to watch "House of Wax." Don't. Unless you like watching acid sprayed on living humans and fingers being cut off and stuff while superglue is on your lips. I'll never look at wax the same again. I'm never letting my friend Jenna pick our movie out again.
Oh... and If you have any awesome V-day stories to share, feel free to post them below. All Joe and I really did was go to IHOP in the morning, watch a movie & eat a late dinner at a steakhouse.


Sock Update:
First sock down. I think this pair will definitely be done in time for Mardi Gras! The pattern will be called "Carnival," inspired by the medieval folk culture of the Carnival. Explaination & sock update tomorrow in a new post!

Photobucket

Tuesday, February 10, 2009

Punk Rock Tunic

I enjoy the brainless knitting in the round that 'mostly stockinette' raglans have to offer. There's just enough simple variation to keep your mind sane, while at the same time, you never really have to look down at a pattern the whole way through. At the same token, I also love the option to work top-down, which means from a lazy arse's point-of-view: less work.
Alright, alright. You got me. You get to try it on as you go. It fits better.

Photobucket

I was going to call this WIP "Inner Sanctuary," because of the ripple-like pattern that I created. However, I decided to swap the name for something else. (I really am bad at naming my own works.) This design will henceforth be called "Punk Rock Tunic" because it seems more hardcore than peaceful.

Photobucket

I have successfully enjoyed yet another gorgeous day basking in the sun (and slightly brisk wind) I not only knit a little outside on our deck, but I snuggled up with a comfy down blanket and my most recent read, "Bitten." Has anyone read it? I'm about half way through. I heard that it was written better than the Twilight series, so I had to try it out.


Photobucket

At the moment, I am finishing up the base of the tunic, and I'll probably end up single-crocheting the top of the tunic and figure out something for the sleeves. It will most likely just be seed-stitch, just like the base of the tunic.

My dear Valentine comes home Friday evening! I'm so excited! Before we go off and have an amazing 1 1/2 day weekend together, I'll make sure to crack out the camera so he can take some snaps of the FO. :) Chao!

Friday, February 06, 2009

"Punk Rock" Teaser

Photobucket
This WIP is 3/4 done. Today's teaser is a panoramic view from my camera. Update coming soon!

Wednesday, February 04, 2009

<3 The BIG Valentine's Sale <3

Hey Knitters. Getting in the mood for Valentine's Day yet? Its not lingerie for your hunny, but I've got a big of a sale going on at the KUAS shop for all you V-Day enthusiasts.

Photobucket

Joe-Bear is snuggling up with the Valentine's Day-inspired sock yarn and lace yarn. Don't worry, I've got some honey in the pantry for when they find themselves in someone's home. Maybe I'll take a pic of him snuggling up with the huge bottle of honey we got from Sam's Club. Hee hee.

You'll see two skeins of "Sweet Valentine" fingering-weight yarn, 1 skein of "Sweet Hearts" lace-weight yarn, 1 set of 5 stitch markers called "Electric Pink," and even 1 skein of "Ever-Pink." All yarn is marked a few dollars lower. I also listed my "Candied Love" sock pattern in there too. :)

Sunday, February 01, 2009

My candied rinds

Photobucket
Anna's Candied Rinds:
Making candied rinds requires a bit of time & energy, but the results are absolutely satisfying. People will keep asking you to make more. This old-time recipe of candied orange rinds has been revamped to be more novel & scrumptious, and will have you feeling a little bit more like Martha.

Items needed:
2 medium saucepans
1 large saucepan (with a wide mouth)
2 cookie sheets
2 cooling racks
2 ladles (with holes)
Paring knife
Tongs
1 large bowl
1 and 1/2 measuring cups
approx 6-7 cups of sugar
2 navel oranges
2 lemons
2 limes
7-8 strawberries
1/2 cup blueberries
Canning jars/plastic container for storage

Photobucket


THE DIRECTIONS:
For all rinds: the set-up
1. wash & dry fruit.
2. Cut horizontally & vertically across the entire fruit.
3. Peel all four sections off the fruit, being very careful not to rip the rinds.
(Save your fruit in a container to be used for different purposes, like orange juice or lemon/limes for your water. No need to waste.)
4. Cut both ends of the rinds so they look rectangular.
5. Slice the rinds length-wise, 1/8'' thick each. You'll get about 5 slices per rind section.
6. Cut off any excess pith (or the actual fruit) off the inside of the rind with your pairing knife to make all of the rinds look uniform.
7. Place your rinds in their own medium saucepan. I mixed lemons & limes together, but boiled the orange rinds separate. You can boil them all together, or mix and match as you see fit. Just remember that orange rinds smell & taste very different than the citrus scent of lemons and limes though.
8. Fill the sauce pan(s) with cold water, until it covers the rinds. Turn the heat on high and turn off only until the water rapidly boils.
9. Drain & rinse the rinds. Put the fruit back into its pan again.
10. Boil fruit this time for 40 minutes, until rinds are completely soft. (Limes might need to boil longer, believe it or not. It has a tougher rind.) Rinds should be flimsy and almost translucent.
11. Drain and rinse rinds.
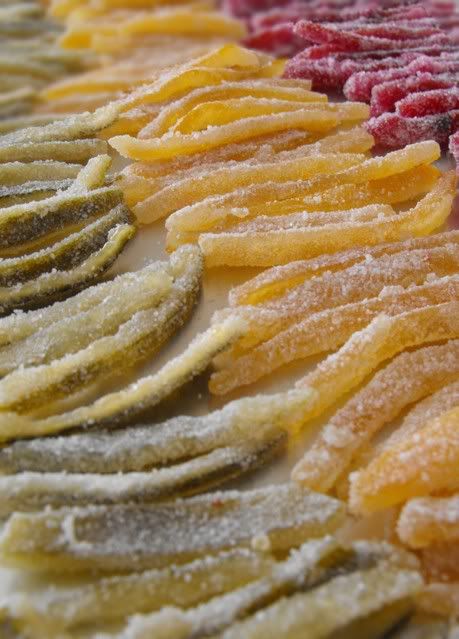
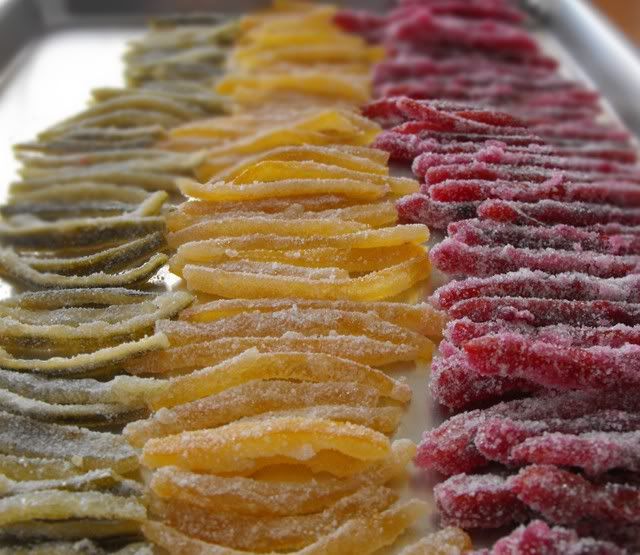
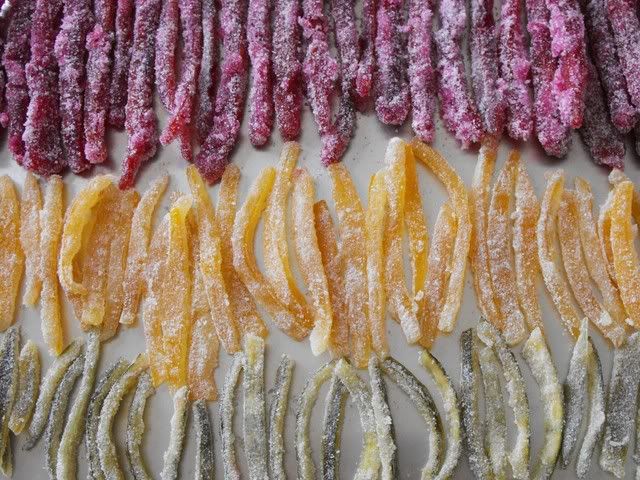
Continue instructions according to type of rinds:

Berry-Orange Rinds:
Everyone's favorite!!
12. Pour 2.5 cups of cold water into a large wide-mouth saucepan. Turn the heat on high.
13. Pour 2 cups of sugar into the pan and dissolve. Stir mixture well with your ladle. Add rinds, sliced strawberries & blueberries.
14. Turn the heat on Medium-low and boil for 40-60 minutes until the water has turned into a thick syrup. Stir often.

Lemon & Lime Rinds:
12. Pour 2.5 cups of cold water into a medium saucepan. Turn the heat on high.
13. Pour 2 cups of sugar into the pan and dissolve. Stir mixture well with your ladle. Add rinds.
14. Turn the heat on Medium-low and boil for 40-60 minutes until the water has turned into a thick syrup. Stir often.

Finishing:
15. Place your cookie sheet under your cooling racks. Using tongs, fish through your berry-orange mixture to grab your rinds. Place all rinds onto one cooling rack (call this the "sticky rack"), being careful not to let the sticky rinds touch eachother. For lemon/lime rinds without a berry-mixture, just grab the rinds and put them on the cooling rack in the same manner.
16. Let rinds cool for about 5 minutes.
17. Pour a couple cups of sugar in a large bowl (the deeper, the better). Start coating your lemon/lime rinds first with sugar, because it's less messy. The easiest method is place several rinds in the bowl and give the bowl a good few shakes to evenly coat the rinds.
18. Line-up all sugar-coated rinds neatly onto your "clean cooling rack."
19. Let the rinds sit overnight to harden more, and package them into mason jars, or whatever you have on hand. Enjoy!

Note: You can blend your berry syrup together to use as an ice cream topper if you'd like.

Photobucket